Bird sketching from life is one of the best skills for new artists to learn. Here’s why! This blog contains affiliate links from which I earn a small commission.
The garden birds at Seaton Wetlands, the nature reserve near my house, have been fed by humans so regularly that they have come to expect and rely on our presence. Many of the birds have become so tame that they will feed from the hand and will dog the heels of – and sing demandingly at – regular visitors who they know to have food. Say what you will about whether this is morally correct but it does present locals and visitors with a wonderful opportunity to engage with wild birds, forge a memorable connection, and observe them more closely.
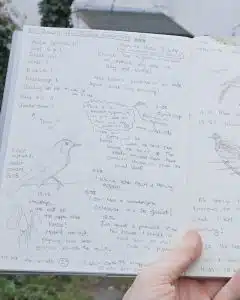
I have been hand-feeding the birds at the Wetlands for many years and after they have finished with my palm, I usually leave the remains of the food on a nearby fence post so that the shyer birds can also have some. This is the perfect time to retreat to the bench nearby and get out the nature journal. I’ll usually sketch the birds that come to the post for about 10 minutes, topping up the food when necessary. I sketch with just a mechanical pencil (Pentel, 0.9, HB lead), releasing the need for any individual sketch to be any good, and moving quickly through sketches to fill out a page. A whole spread of sketches can be completed in this way within the space of that 10 minutes of close observation.
Methods of bird sketching from life
Sketching birds from a lure (the food) is a pretty common technique in the field arts. Over the centuries, many methods have developed for obtaining reference materials for sketching live birds. Of these, a lure and a hide are probably the kindest, but they were insufficient for the level of close observation needed for detailed naturalist studies and scientific illustrations. Many of the eminent naturalist-artists such as John Audubon and the artists employed by John Gould (including his wife Elizabeth), worked from dead birds that had been shot. When you look at Audubon’s birds, you can see this in the postures, despite the efforts to ‘perch’ them into an environment in the paintings.

Other naturalists relied on caged birds and a great trade was done in Victorian times in caged birds from exotic places, many of which would die when removed from their environment and preferred food. Since then, field expeditions have become more common among professional and amateur wildlife artists, who will head to prominent locations to spend hours among bird colonies with binoculars, sketchbook and camera. In this video from 2022, I did just that when visiting the puffin colonies of Skomer, Wales.
But it doesn’t take an expedition to learn field sketching skills. I practice this regularly with garden birds, gulls, ducks, and pigeons. Even if there are no birds in sight, in these modern times, a quick YouTube search will provide you with copious excellent-quality bird videos to draw from. Members of my Nature Journaling Circle have access to my own library of nature photos and videos for reference.
How I started bird sketching
")
")
")
")
")
")
If you find the idea of trying to sketch moving things intimidating, you are not alone. I started trying to learn bird sketching in this little book in 2017 and you can see that I found this skill a trial so did not practice very often. There were a few reasons why my sketching wasn’t working and I wasn’t enjoying it, but it boiled down to one main thing: I was trying to “make good art.” Each sketch mattered too much to me as an individual effort, and I was not thinking enough about the cumulative effect of lots of mistakes leading to “good art” later on.
As I look thorough my outdoor nature journals since 2019, it is clear to me that I started to sketch birds from life without any enormously conscious effort to do so. The birds were there, I was there, I had time, and so I sketched. I think that I grew tired of always writing lists or descriptions and so started to doodle the birds, allowing all mistakes and bad sketches to remain on the page. This gradual effort over the space of 4-5 years has led to a considerable improvement in the quality of the sketches and a reduction in the amount of time needed to get down the key details of any bird.
The anatomy of a field sketch
So, let’s make it clear right now that sketching birds outside is likely to be messy and your sketches won’t always be very good. Birds will move about and disappear from view regularly. They may be far away and you’ll need to get used to sketching with binoculars or a scope, something that takes quite a bit of practice! As a result, expect your field sketches to look like a page of unfinished drawings, some of which you may finish or embellish later. I usually use these pages as a reference for more detailed work in the studio and rarely come back to improve the sketches, although many artists will return to the field page and colour or paint over the field sketches. The work of Keith Brockie is a huge inspiration for me in this sense. https://www.flickr.com/photos/60559624@N06/page3
In my field sketches, I try to get as much information as I can while the bird is still present. This includes important features, which I usually try to put down in this order:
- What is the shape of the head and body and at what angle does the back of the head attach to the body?
- Where is the eye positioned relative to the beak and what is the beak shape?
- At what angle does the tail (if present) emerge from the back?
- What are the major areas of tone (dark and middle tones) – can I quickly shade these in?
- Where are the legs positioned and what do the feet look like (if visible)?
I may then add a few details of the bird’s environment, such as a twig the bird stands on or the water and reflection if it is a wader. Importantly, I will also add notes about what the bird was doing, its behaviours, and ensure my sketches are labelled in terms of date, time, and location. I also like to write down colours, often shades of Inktense pencil as I know these best, so that I could paint the bird later if I wanted. Usually, I will take some photos as well, and then all these materials can be used to do some more detailed work later on.


")
")
")
Why mistakes are great
In field sketching, the intention is to notice as much as possible, before the subject disappears from view. If the subject remains long enough to allow you to sketch it, the process is about finding the answers to questions such as those posed above. For example, answering the first question – what is the shape of the head and body – might take up a whole page of sketches. It is a continuous process of learning how to transfer what you see quickly onto the page using gesture with the pencil. The mistakes are crucial in this, as they help you to refine that skill. When you are happy that you have a sketch or two with the correct overall shape, that is when moving on to the next step (putting in an eye and beak) will be beneficial.
I love a mistake and learning to embrace yours is one of the greatest things you can give yourself as an artist. Filling sketchbooks or journals with sketches and not removing any mistakes or bad drawings (no rubbers in the field!) will help you to learn that mistakes are a fundamental part of learning a skill. As long as you are continuing to address any errors you spot in your next sketch, you are improving. If you use a rubber in these field sketching situations, you are spending time on deleting your efforts and not on rapidly correcting them.
I should say here that there are definitely times for rubbers and accuracy. Back in the studio, when I draw from my photos intending to make a piece of artwork based on my field experiences, I have a rubber to hand and am very careful about getting the initial sketches right. This is very different from the field sketching experience and learning to separate the two will do so much to help you grow as an artist. This is why I have two separate nature journals, as described in this post.
It’s about learning to look
I hope you will get outside and give field sketching of birds a try. If you’d like some practice, this month in the Nature Journaling Circle has been all about bird sketching from photos and video. The recording of the Zoom tutorial is available for all members, so I hope you will consider joining us. The easiest way to get comfortable with fast outdoor sketching is to reframe it in your mind away from “I want to make art” to “I want to learn to observe better”. At its heart, field sketching is about learning to be better at looking and at transferring what you see quickly onto paper. As long as you are doing that, you can’t really go wrong.
Want to have a go yourself? The Nature Journaling Circle membership is a welcoming space for you to learn field sketching and other nature journaling skills with me. There’s a monthly live tutorial and a social session, plus access to all my pre-recorded video courses and a community of lovely nature journalers from around the world. If that’s something you might be interested in, consider joining us here.